Defining and raising exceptions
Definition of Global Exception Classes
Define additional attributes in your exception class as necessary (for example, for generic extensions to exception texts).

You use Class Builder to create a global class as described in SAP Library. When you enter the name of global class, use the prefix CX_. Choose the Exception Class option as the class type.
Define Variable Exception Texts
Save as many exception texts as you need. When you save exception texts, you can insert attributes as parameters in the static text using the form &<attribute_name>&.
For the first text you create, always use the predefined static constant as an ID. The constant always has the same name as the exception class itself. If the raiser of the exception does not specify a text when the exception is raised, the system uses the text with this ID.
You define other IDs for all other texts. Class Builder then generates identically named static constants automatically. When the exception is raised, pass one of these constants to import parameter TEXTID to specify the appropriate text for the exception instance.
In releases before SAP NetWeaver AS 6.40, exception texts for global exception classes and their translations were stored in OTR. You can assign several texts to a single class. You assign a text to an exception using the TEXTID attribute, which contains the globally unique ID of the text object in OTR in an instance at runtime. The GET_TEXT method then exports this text, replaces any text parameters with the contents of the relevant attributes as required, and returns the text as a character string.
Activate the exception class after filling in the exception texts.

To Define Global Exception Classes
Steps
- In the Class Builder, in the unnamed dropdown list on the left of the screen, choose Class/Interface.
- In the unnamed field, enter the new exception class name, use the prefix ZCX_. Press Enter.
- To create the class, choose Yes.
Results
A Create Class dialog box displays. - Select the Exception Class radio button, and, if you want the exception texts to come from an existing message class, choose the With Message Class
- Enter a short description.
- Do not change the default Superclass CX_STATIC_CHECK. Choose Save.
Results
The Create Object Directory Entry dialog box displays. - In the Create Object Directory Entry dialog box, enter your package name and choose Save.
Results
A Prompt for transportable Workbench request dialog box displays. - In the Prompt for transportable Workbench dialog box, accept the defaults and choose Continue.
- Define additional attributes in your exception class if necessary (for example, to use in the exception texts).
- Choose the Texts tab in the Class Builder, and create as many exception texts as you need. When you do so, you can insert your attributes as parameters in the static text in the form &<attribute_name>&.
Use of the RAISE EXCEPTION Statement
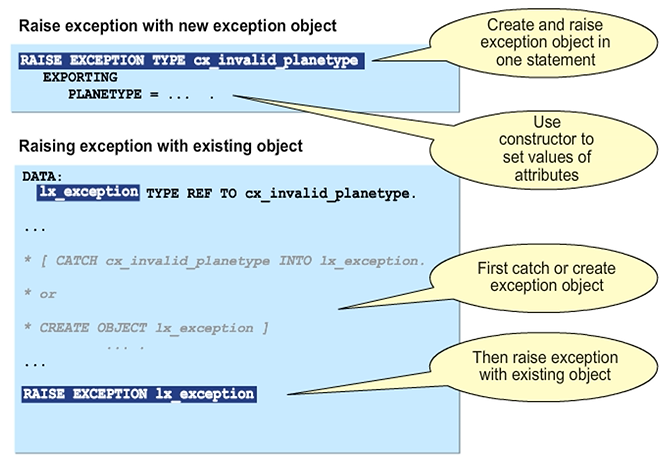
The figure shows examples for statement RAISE EXCEPTION.
Raising class-based exceptions is done using the RAISE EXCEPTION statement. There are two variants of the statement.
Variants of Statement RAISE EXCEPTION ...
RAISE EXCEPTION TYPE <exception_class> [EXPORTING ...].
This statement creates a new exception object that is an instance of the <exception_class> class.
RAISE EXCEPTION <object_ref>.
This statement uses an existing exception object that the one <object_ref> points to.
The exception object was either created directly using a CREATE OBJECT statement or caught in a previous CATCH ... INTO ...statement.
When using the first variant, it is possible to provide values for the constructor parameters using the EXPORTING addition. One of these parameters is used to set the exception text in the new exception object.
Exception Texts